


Inside WebSockets: Building a Chat Application.
A deep dive into how a network protocol makes it possible for real-time communication to happen on the internet and leveraging it through a mini-app.


😊 Introduction
There are a few things I can conjure up while you read this sentence. One, you just read this. Second, you probably texted someone in the last second, an hour or maybe today.
Live communication between us through texts/images/gifs or in more colloquial terms "texting", on a shared platform comes so naturally now, considering the technology working behind the scenes is in fairly recent history.
But ever wondered how this whole system feels so live? How you don't have to wait similar to a browser page load to get your text across? How exactly do you know when your data got delivered and when it was read? But most importantly, can we build a similar one for ourselves?
The answer lies in one word, WebSocket.
🤔 Okay, I'll bite. What's a WebSocket?
Instant messaging platforms such as Whatsapp work on top of a technology called WebSocket.
A WebSocket is a network protocol which provides a medium to exchange data between a client and a server. This data can be passed without breaking the connection between the two and can be sent in both directions.
Sounds like a convenient piece of technology, right? However, isn't real-time communication a long-existing problem and the solution of WebSockets came fairly recently?
Time for the why folks!
💭 Why WebSockets then?

In most live applications, the limitation of a traditional HTTP protocol becomes very visible, very quickly. In such a use case we need information from our servers as soon as it’s available while the server will be silent, new data or not, unless or until a consumer requests an update through the HTTP request/response paradigm.
That's not to say that all sorts of hacks were not tried and tested by developers with the existing protocol. We went through multiple approaches from Comet to HTTP long polling, a way to 'mimic' event-based communication between the client and the server. The challenge of achieving low latency and scale eventually led to WebSockets being the chosen one, so to speak.
⚙️ So, how does a WebSocket work?
If you're a developer, this is the point it gets interesting.
To open a WebSocket connection, we need to create new WebSocket using the special protocol ws in the URL. There’s also encrypted wss:// protocol. It’s similar to HTTPS, for WebSockets.
let socket = new WebSocket("wss://socketsbay.com/");
💡Always prefer using
wss://The
wss://protocol is more secure as compared tows://It's because WSS is a WebSocket built over TLS which is akin to HTTPS being an HTTP built over TLS.
The Transport Security Layer or TLS makes sure the data packet gets encrypted at the sender's end and decrypted at the receiver's end leading to a minimal instance of privacy compromise for a user.
There are namely 4 events associated with a WebSocket on the client-side, once you establish a connection with the server.
open - fires when a WebSocket connection is established.
message - fires when some data is received through the WebSocket connection.
close - fires when the WebSocket connection is closed.
error - fires when there's been some error such as not being able to send data with the connection, leading to WebSocket closing the connection.
Here's an example to get you more acquainted with these events:
let socket = new WebSocket("wss://socketsbay.com/");

socket.onopen = (e) => {
  console.log("Connection Established");
  socket.send("Hi! I'm Nischal.");
};

socket.onmessage = (event) => {
  console.log("Data received from server: ");
  console.log(event.data);
};

socket.onerror = (error) => {
  console.log("Error occured: ");
  console.log(error);
};

socket.onclose = (event) => {
  if (event.wasClean) {
    console.log("Connection closed cleanly:");
    console.log(`Error code: ${event.code}`);
    console.log(`Error reason: ${event.reason}`);
  } else {
    console.log("Connection died abruptly");
  }
};
⚒️ Come, build with me!
Let's get into the more DIY part of the blog. We'll build a nimble chat app with whatever we've garnered about Websockets so far.
TIL: If you prefer more video-based codealongs, here's a great talk on the same topic from Freecodecamp using the Socket.io library👇🏻
For this code walkthrough, I will assume you are familiar with the basics of HTML, CSS, JavaScript and NodeJS.
To get started create a folder named chat-app and inside the same folder, two sub-folders named, client and server. We'll keep the client-side code in the client folder and the server-side logic in the server folder.
Step 1: Create a package.json file inside the server folder and paste the following code inside the same file:
{
  "name": "chat-app",
  "version": "1.0.0",
  "description": "A chat app built using WebSockets",
  "main": "index.js",
  "scripts": {
    "devStart": "nodemon server.js"
  },
  "author": "",
  "license": "ISC",
  "dependencies": {
    "socket.io": "^2.2.0"
  },
  "devDependencies": {
    "nodemon": "^1.19.0"
  }
}
Step 2: Create an index.html file inside the client folder. This is a basic native HTML form with links to the stylesheet and script.js files. Add the following HTML code inside it:
<!DOCTYPE html>
<html lang="en">
<head>
  <meta charset="UTF-8">
  <meta name="viewport" content="width=device-width, initial-scale=1.0">
  <meta http-equiv="X-UA-Compatible" content="ie=edge">
  <title>Chat App - By Nischal</title>
  <link rel="stylesheet" href="./style.css" />
  <script defer src="http://localhost:3000/socket.io/socket.io.js"></script>
  <script defer src="script.js"></script>
</head>
<body>
  <div id="message-container"></div>
  <form id="send-container">
    <input type="text" id="message-input">
    <button type="submit" id="send-button">Send</button>
  </form>
</body>
</html>
Step 3: Create a style.css file inside the client folder. This will provide some basic styling to our HTML form. Copy the following styles and paste the same inside the new file:
  body {
  padding: 0;
  margin: 0;
  display: flex;
  justify-content: center;
  align-items: center;
  min-height: 100vh;
  min-width: 100vw;
}

#message-container {
  width: 80%;
  max-width: 1200px;
}

#message-container div {
  background-color: #eb264e;
  padding: 5px;
}

#message-container div:nth-child(2n) {
  background-color: #fc6e8a;
}

#send-container {
  position: fixed;
  padding-bottom: 30px;
  bottom: 0;
  background-color: white;
  max-width: 1200px;
  width: 50%;
  height: 50px;
  display: flex;
}

#message-input {
  flex-grow: 1;
}

#send-button {
  width: 200px;
}
Step 4: Create a script.js file inside the client folder. The logic is to create a client-side WebSocket connection and send a message from the user as a form input to the backend Nodejs server. Paste the following JavaScript code inside the same file:
//Selectors
const messageContainer = document.getElementById('message-container');
const messageForm = document.getElementById('send-container');
const messageInput = document.getElementById('message-input');

//Socket Connection
const socket = io('http://localhost:3000');


//Message Alert
const name = prompt('What is your name?');
appendMessage('You joined');
socket.emit('new-user', name);


//Socket Method
socket.on('chat-message', data => {
  appendMessage(`${data.name}: ${data.message}`);
});

socket.on('user-connected', name => {
  appendMessage(`${name} connected`);
});

socket.on('user-disconnected', name => {
  appendMessage(`${name} disconnected`);
});


//Event Handlers.
messageForm.addEventListener('submit', e => {
  e.preventDefault();
  const message = messageInput.value;
  appendMessage(`You: ${message}`);
  socket.emit('send-chat-message', message);
  messageInput.value = '';
});

const appendMessage = (message) => {
  const messageElement = document.createElement('div');
  messageElement.innerText = message;
  messageContainer.append(messageElement);
}
Step 5: Create a server.js file inside the server folder. This is to create a server-side WebSocket connection to send events to the client. Paste the below-mentioned code in the same file:
const io = require('socket.io')(3000);

const users = {};

io.on('connection', socket => {
  socket.on('new-user', name => {
    users[socket.id] = name
    socket.broadcast.emit('user-connected', name)
  })
  socket.on('send-chat-message', message => {
    socket.broadcast.emit('chat-message', { message: message, name: users[socket.id] })
  })
  socket.on('disconnect', () => {
    socket.broadcast.emit('user-disconnected', users[socket.id])
    delete users[socket.id]
  })
});
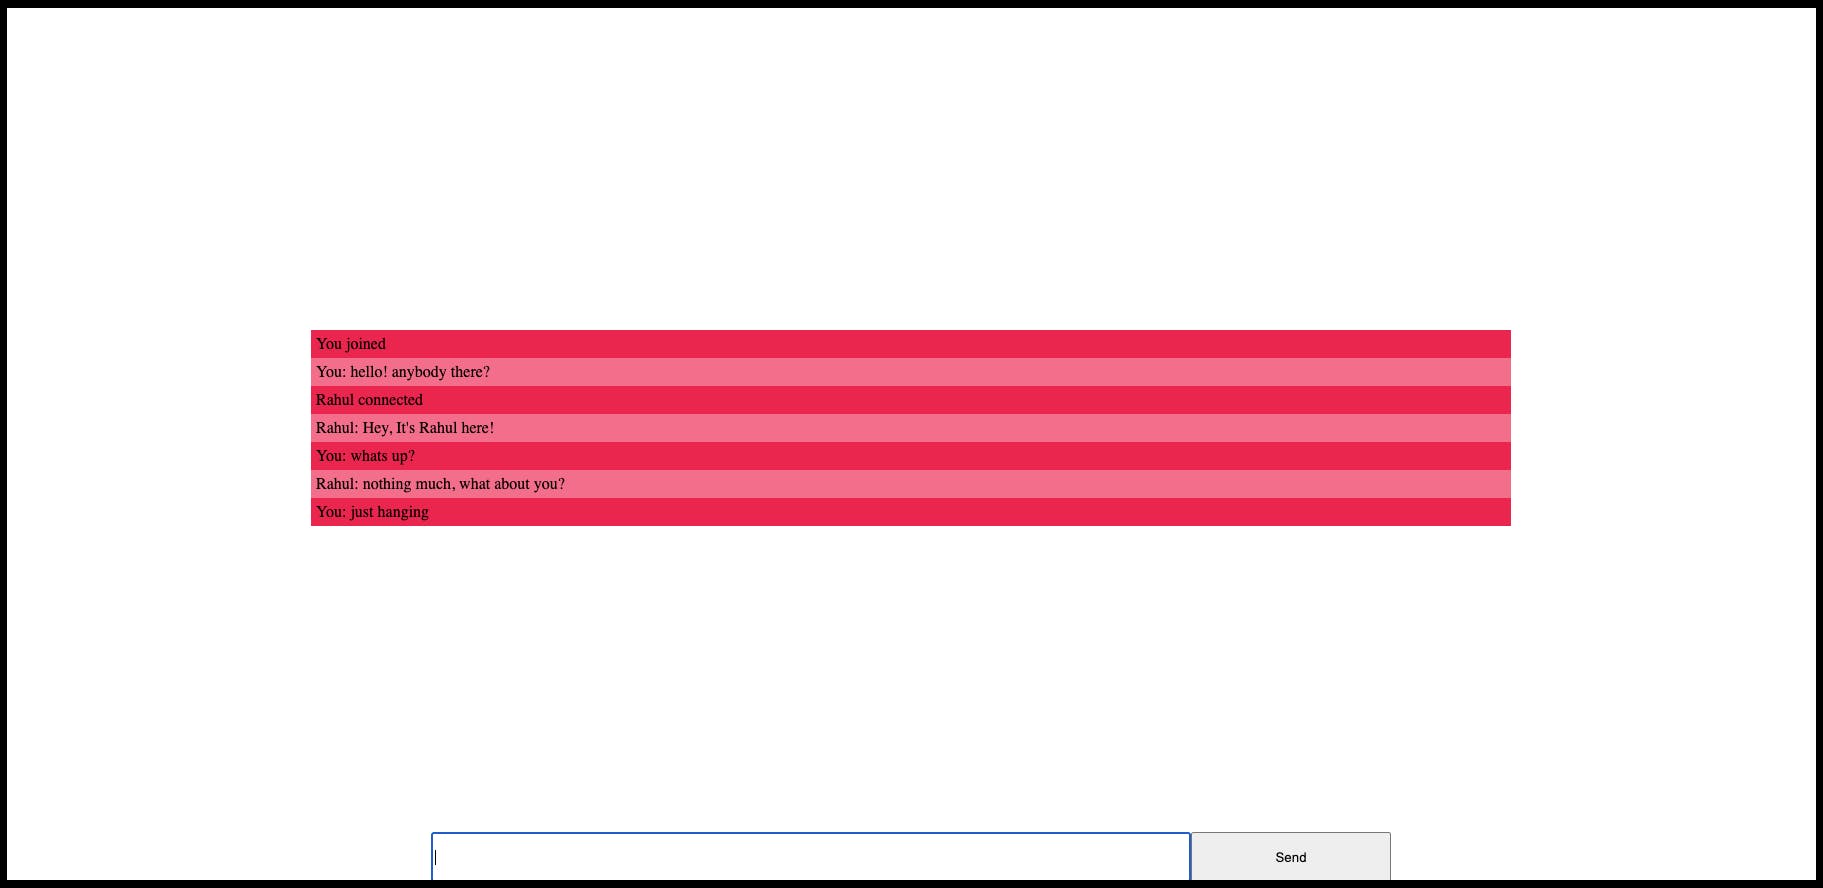
Now's the time to test out the app!
Open the
Terminalin macOS/Linux orCommand Promptin the case of Windows OS.Navigate to the
server, the folder we created previously.Run the following command:
npm run devStartOpen the HTML file
index.htmlin your browser.And Voila! if you followed all the steps I mentioned before, I am assuming you have a mini-chat app running on your machine. Go ahead and open the same HTML file on another tab in the browser :)
⛰️ For the enthusiasts: Where to put my Websocket?
Thank you so much for taking the time to read this far. Here's some selective goodness for you. ✨
This can be a whole other piece of writing since deciding where to put the WebSocket connection has to be made after assessing one's use case. Here are some quick guiding principles:
In a functional component?
Can you put a Websocket in a component? A resounding, yes!export const functionalComponent = () => { const [val, setVal] = useState(null); const webSocket = useRef(null); useEffect(() => { const socket = new WebSocket("wss://echo.websocket.events/"); socket.onopen = () => { console.log("opened"); }; socket.onclose = () => { console.log("closed"); }; socket.onmessage = (event) => { console.log("got message", event.data); setVal(event.data); }; webSocket.current = socket; return () => { socket.close(); }; }, []); return <div>Value: {val}</div>; };In a hook?
It works, and it’s easy to understand and reuse! However, it’s not for every use case. Putting the WebSocket in a hook leads to a connection to different servers. For multiple parts of an application that all need to connect to the same server, using hooks is not a good fit.
 export const useWebSocket = ({ url }) => {
   //to check connection is established or not.
   const [isReady, setIsReady] = useState(false);
   //to store event.
   const [value, setValue] = useState(null);

   const webSocket = useRef(null);

   useEffect(() => {
     const socket = new WebSocket(url);

     socket.onopen = () => setIsReady(true);
     socket.onclose = () => setIsReady(false);
     socket.onmessage = (event) => setValue(event.data);

     webSocket.current = socket;

     return () => {
       socket.close();
     };
   }, []);

   // bind is needed to make sure `send` references correct `this`
   return [
     isReady,
     val,
     webSocket.current?.send.bind(webSocket.current)
   ];
 };
In a context?
Can you put a Websocket in a context? Yes, most definitely and the one which I prefer the most. The best part is that it's only one Websocket. All parts of the app that useWebsocketContextuses the same, single Websocket.The code to do so is very similar to the hook above.
 //ready, value, send
 export const WebsocketContext = createContext(
   false,
   null,
   () => {}
 );

 // Make sure to put WebsocketProvider higher up in
 // the component tree than any consumers.
 export const WebsocketProvider = ({ children }) => {
   const [isReady, setIsReady] = useState(false);
   const [value, setValue] = useState(null);

   const webSocket = useRef(null);

   useEffect(() => {
     const socket = new WebSocket("wss://echo.websocket.events/");

     socket.onopen = () => setIsReady(true);
     socket.onclose = () => setIsReady(false);
     socket.onmessage = (event) => setValue(event.data);

     webSocket.current = socket;

     return () => {
       socket.close();
     };
   }, []);

   const ret = [
    isReady,
    value,
    webSocket.current?.send.bind(ws.current)
   ];

   return (
     <WebsocketContext.Provider value={ret}>
       {children}
     </WebsocketContext.Provider>
   );
 };
There are many places where you can put your Websocket and each has its pros and cons. Now it's up to you to decide what works best for you!
✍️ Conclusion.
In conclusion, WebSockets are one of the fundamental technologies that developers come across in their work and getting a good understanding gives one a chance to experiment with the protocol.
As you continue to work with live communication on the internet, I encourage you to experiment with these concepts and see how they can make your apps more performant.
Thanks for reading! Please like and share this article if it has been a helpful read. Also, do share in the comments anything I missed in the article. Cheers :)